

🕐 9 MIN ESTIMATED READ TIME
Most guides to a best budget ergonomic setup for remote work read like shopping lists — buy this chair, this stand, this mouse, add it up, done. That’s not how limited money actually works. The real question isn’t what a complete setup includes. It’s what to buy first when you can’t buy everything today.
This guide is about how to build an ergonomic workspace on a budget without guessing where to start. Fix the biggest limitation of working on a laptop first, and everything after that is optional — valuable, but optional.
Table of Contents
Affiliate Disclosure: This post contains affiliate links. We may earn a small commission at no extra cost to you. Prices and availability are subject to change—please check the product links for current details.
Why buying in the wrong order wastes your budget
Spend your first dollars on the wrong thing, and you end up with accessories that don’t actually solve your biggest problem — a nicer mouse pad while your neck is still bent over a low screen, or a cushion for a chair when the real issue is that your laptop’s keyboard is glued to its screen. Prioritizing ergonomic office equipment correctly means each dollar addresses something that’s actually limiting you, not just something that sounds nice to add. Getting that order right is worth more than spending more.
Two real priorities, not a shopping list — fix the laptop’s core limitation first (~$70), then add lumbar support only if your chair genuinely needs it (~$50 more). Everything else can wait.
Where your money goes furthest
If you’d rather skip ahead, here’s the short version:
| Priority | What it fixes | Approximate cost |
|---|---|---|
| 1. The laptop problem | Screen height, hand position | ~$70 |
| 2. Your sitting foundation (if needed) | Lower back support | ~$50 |
| 3. Everything else | Refinements, not fundamentals | Varies |
Priority 1: Fix the biggest limitation of working on a laptop
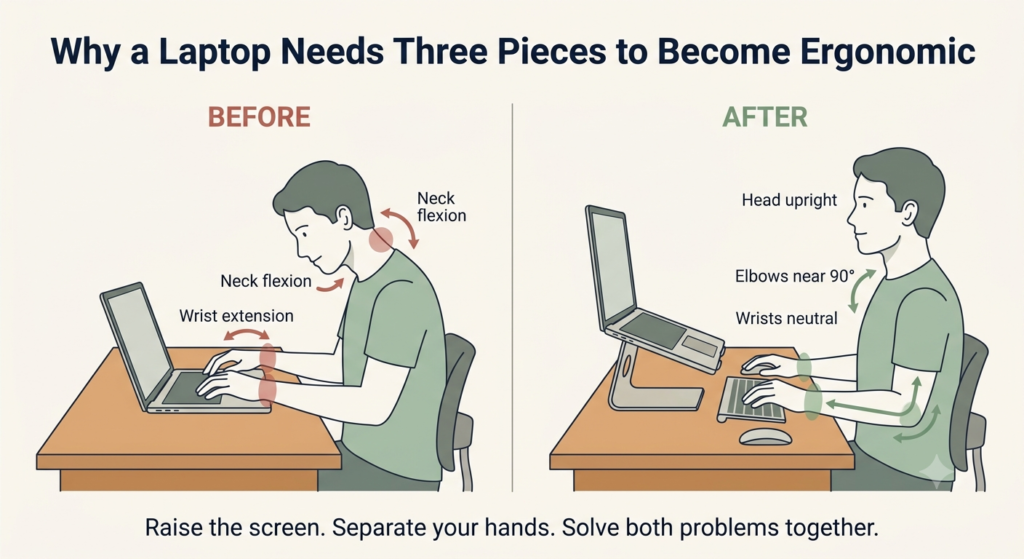
A laptop has one fundamental limitation: the screen and the keyboard are physically attached. That means you can’t fix your screen height without also moving your typing position — raise one, and the other moves with it, whether that helps or not. This is why the first real investment isn’t a single accessory. It’s a small system: a stand to raise the screen, and external input devices to keep your hands where they actually belong.
Why an external keyboard matters before an ergonomic keyboard
Once the screen moves up, the laptop’s built-in keyboard moves with it — now you’re reaching up and typing at an angle instead of down at a flat desk. That’s a new problem, not the same one you started with. The type of solution here isn’t a specific keyboard shape; it’s simply having a keyboard that sits separately from the screen, at its own height. An external keyboard, even a standard one, solves that separation. It doesn’t correct wrist angle the way a dedicated ergonomic keyboard does — that’s a real upgrade, just a later one, once budget allows for it.
Raise the screen: BESIGN LS03
If your laptop sits flat on the desk all day, your neck does the work a stand should be doing — tilting down for hours to look at a screen well below eye level. The type of fix here is straightforward: something that lifts the screen closer to eye level, without needing to be complicated or expensive.
Our pick: BESIGN LS03. It assembles from three pieces in under a minute, no tools required, and holds that height with nothing to adjust or eventually loosen — the simplicity is the whole point at this stage. It fits most laptops up to 15.6 inches and supports up to 8.8 pounds, which covers standard laptops comfortably, though heavier gaming or workstation machines may need something sturdier.
What we like
- Nothing to loosen over time: no moving parts means nothing to eventually wobble after months of daily use.
- Genuinely quick to set up: three pieces, no tools, ready in under a minute.
- Tested stability: holds steady even under a larger laptop with real typing pressure.
What to keep in mind
- Fixed height only: there’s no adjustment, so it either matches your desk or it doesn’t.
- Not rated for the heaviest laptops: 8.8 pounds covers most standard machines, not gaming or workstation-class devices.
Best for: anyone who wants the simplest, most reliable option with nothing to adjust or eventually fail.
Not the right fit if: you have a heavier gaming or workstation laptop that pushes past 8.8 pounds.
Separate your hands from the screen: Logitech Pebble Keys 2 K380s
With the screen raised, typing directly on the laptop’s own keyboard means reaching up at an angle that gets uncomfortable fast. The type of solution here isn’t a specialized shape — it’s simply a keyboard that sits on the desk at its own height, independent of wherever the screen ended up. Any external keyboard does this job; it doesn’t need to be ergonomic by design to solve this specific problem.
Our pick: Logitech Pebble Keys 2 K380s. It’s compact, connects over Bluetooth to up to three devices, and its own listing describes a familiar, laptop-like typing feel — which is honest: this isn’t a split or tented design, and it won’t correct wrist angle the way a dedicated ergonomic keyboard would. What it does is make an ergonomic laptop position possible in the first place, by letting your hands stay at a separate, comfortable height while the screen stays raised.
What we like
- Genuinely portable and compact: slim enough to travel with, if your setup needs to move.
- Connects to three devices at once: useful if you switch between a laptop and a tablet or second computer.
- Long battery life: rated for years of typical use before needing a charge.
What to keep in mind
- Not an ergonomic keyboard by design: it separates your hands from the screen, but doesn’t correct wrist angle the way a split or tented keyboard does.
- A standard, flat layout: fine for most typing, but offers none of the specialized positioning of a dedicated ergonomic model.
Best for: anyone who just needs to separate their hands from the raised screen without a bigger investment yet.
Not the right fit if: you already deal with wrist strain — a dedicated ergonomic keyboard will serve you better than this standard layout.
Fix your grip on the cursor: TECKNET Ergonomic Vertical Mouse
A flat mouse keeps your forearm twisted inward for hours of clicking and scrolling, which is a different problem than screen height or typing position — it’s about the angle of your wrist and forearm specifically. The type of solution here is a mouse with a genuinely different shape, not just a different name on the same flat design.
Our pick: TECKNET Ergonomic Vertical Mouse. Its listing confirms a real 52-degree vertical angle and a natural handshake grip — this is shape, not just marketing language. At under $25, it’s a low-cost way to find out whether that angle actually helps your hand before spending more on a premium option. It’s built for right-hand use only, and best suited to smaller to medium hand sizes.
What we like
- A genuine vertical angle, not just a label: the 52-degree design and handshake grip are confirmed specifics, not vague marketing claims.
- Adjustable sensitivity: six DPI levels let you match cursor speed to the task instead of relying on bigger wrist movements.
- A low-cost way to test the shape: inexpensive enough to find out if vertical works for you before committing to something pricier.
What to keep in mind
- Right-hand only: left-handed users will need a different option entirely.
- Sized for smaller to medium hands: larger hands may find the grip less comfortable over long sessions.
Best for: anyone testing whether a vertical grip helps before committing to a pricier option.
Not the right fit if: you’re left-handed, or you have larger hands that need more grip surface.
The core fix costs around $70. Adding lumbar support — only if your chair needs it — brings the total to $119.
Check the setup, not just the shopping list
Buying the right three pieces doesn’t automatically mean they’re positioned correctly — a few quick checks confirm the money actually solved the problem. The top of your screen should sit at or just below eye level, so you’re looking slightly down rather than up or straight ahead with your chin raised. Your elbows should rest at roughly 90 to 100 degrees with the keyboard at that height, not reaching up or down to type. If the mouse feels like it’s pulling your shoulder forward, it’s usually sitting too far from the keyboard, not too far from your hand.
None of this needs a tape measure — if your neck feels level and your wrists aren’t bending up or down to type, the setup is doing its job.
Priority 2: Improve your sitting foundation if your chair needs help
Once your laptop is no longer forcing a poor working position, the next question becomes whether your chair is limiting you too.
Not every budget needs to go here — and for many people, it shouldn’t be next. If your chair already lets you sit with your feet flat on the floor and some support at your lower back, the laptop upgrades above matter more than anything you’d add to your seat. But if your chair genuinely lacks that support, this becomes the priority, even ahead of the laptop stand.
The type of solution here isn’t a new chair — that’s a bigger investment for another time. It’s targeted support that fills the gap most budget chairs leave at the lower back.
Our pick: Mount-It! ErgoActive Lumbar. Adjustable straps keep it in place on most office chairs, so it works as an add-on rather than requiring you to replace the chair itself. Fine-tuning an existing desk setup — monitor height, footrest, and lumbar support together — is worth a closer look if your chair needs more than just this one piece.
For many people, Priority 1 alone is enough. But if your chair genuinely needs the support, adding this piece brings the total to around $119 — a real number, not a promise, and still well short of furniture-level spending.
What can wait until later
A few more pieces genuinely help, but none of them fix a limitation the way the first two priorities do — they’re refinements, not fundamentals. A wrist rest adds cushioning once your hands are already in a good position. A footrest helps if your feet don’t reach the floor, but it’s a smaller gap than screen height or hand position. A portable stand matters only if you regularly work somewhere other than your main desk.
None of these are wrong to buy. They’re just not where your first dollars go furthest.
Common budget mistakes
Buying accessories before fixing screen height is the most common one — a wrist rest or a nicer mouse pad doesn’t do much if your neck is still bent over a low screen all day. Buying two products that solve the same problem is another: a lumbar cushion and a new office chair aren’t both necessary if the cushion alone closes the gap. And choosing temporary comfort over correct position — a soft cushion instead of the right height — tends to feel better for a week and worse for months.
Frequently Asked Questions
What should I buy first for an ergonomic laptop setup?
A laptop stand, paired with an external keyboard and mouse. Raising the screen without separating your hands from the laptop just moves the problem instead of solving it, so these three work as one purchase, not three separate decisions.
How can I make my remote workspace ergonomic on a strict budget?
Start with the laptop itself, not the room around it. Screen height and hand position affect you every single hour of the day, while a nicer chair or a second monitor matter less if the core laptop problem is still unsolved.
Is a laptop stand worth it for remote work?
Yes, for most people who work from a laptop for more than an hour or two a day, especially when paired with an external keyboard and mouse. It’s one of the few upgrades that changes something you interact with constantly, for a relatively small cost.
What ergonomic accessories should I avoid buying on a budget?
Nothing is worth avoiding entirely, but sequencing matters — accessories that address secondary comfort, like wrist rests or footrests, are worth less before the primary problem of screen height and hand position is solved.
Should I fix my chair or my laptop setup first?
It depends on your current chair. If it already supports a reasonably neutral sitting position, the laptop setup comes first — it’s the bigger improvement for the money. If your chair genuinely lacks basic support, fix that first.
The Bottom Line: Fix the Limitation First, Add Refinements Later
A best budget ergonomic setup for remote work isn’t about buying everything at once — it’s about knowing what to fix first. Start with the laptop’s core limitation: screen height and hand position, solved together, for around $70. Add support for your sitting position only if your chair actually needs it. Everything else can wait until the fundamentals are handled.
The goal isn’t to build a complete ergonomic office in one purchase. It’s to solve the biggest limitation first, then improve the rest only when it actually adds value — that’s the core of smart ergonomic investments for remote workers.
If none of these exact picks fit your situation, you can browse more laptop stand keyboard mouse options using the same rule: fix the biggest limitation first, then add refinements only once that’s solved.
RELATED GUIDES
Laptop Stand + Keyboard + Mouse: Complete Guide
The same core system covered here, without a budget constraint driving the choices.
Read the Guide →Ergonomic Desk Setup Adjustments
For the specific gaps a standard setup still leaves — monitor height, footrest, and lumbar support.
Read the Guide →About This Guide
This guide focuses on the changes most likely to improve a laptop workspace first, because not every ergonomic upgrade delivers the same impact. Its goal is to help you make informed decisions about where to start and what can reasonably wait until later.
It’s researched and edited by César Cervantes González (Cerlez) using verified manufacturer specifications and independent reviews rather than hands-on testing.